RPI_hpc v1.0
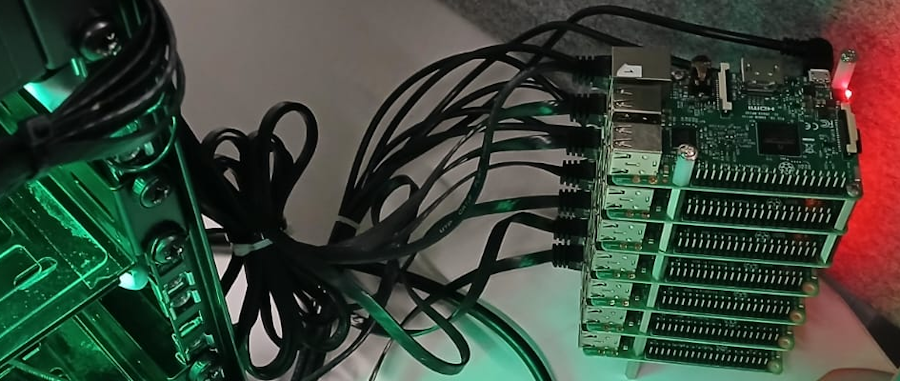
The workflow here aims for a pre-configured setup and minimal package dependency so, in the upcoming iterations these can be automated via scripts. There are few sections where certain commands doesn't work but are included for completeness.
Flashing arm image
Raspbian lite OS is used across all the nodes. To flash the OS, download the aarch64 image and identify the SD card using lsblk command.
$ wget https://downloads.raspberrypi.com/raspios_lite_arm64/images/raspios_lite_arm64-2025-12-04/2025-12-04-raspios-trixie-arm64-lite.img.xz
$ lsblk
Umount all SD card partition, xzcat command will decompresses the file, now flash using dd command (disk copying tool).
# umount /dev/\*blk0p1
# xzcat 2025-12-04-raspios-trixie-arm64-lite.img.xz | dd of=/dev/mmcblk0 bs=1M oflag=direct status=progress
# 2986344448 bytes (3.0 GB, 2.8 GiB) copied, 283.074 s, 10.5 MB/s
Configuring OS Pre-boot
There are two ways one can setup the service before booting, raspbian OS respect files on /boot partition so to
setup user and sshd server, source
# cd /boot
# touch ssh
# echo "password" | openssl passwd -6 -stdin > userconf.txt
Edit userconf.txt to append the username infront as rpi4:<encrpyted_text>. Functionality with this preboot config
file is limited so, chroot is also needed. So after this, the first boot, this will automatically detect 'ssh' and creats a user rpi4.
Chroot into aarch64 sd card
Since I'm working on amd64 system and trying to chroot into arm64/aarch64 image, I need to setup the emulator using qemu-static packages, (forum discussion about this topic). Install the appropriate qemu package and mount the / and /boot partition of the sd card.
# pacman -S endeavouros/qemu-arm-aarch64-static-bin
# mount /dev/mmcblk0p2 /tmp/mnt
# mount /dev/mmcblk0p1 /tmp/mnt/boot
To enable essential services while using chroot, /proc and /sys partitions also needs to be mounted,
source
cd /tmp/mnt
sudo mount --bind /dev dev/
sudo mount --bind /sys sys/
sudo mount --bind /proc proc/
sudo mount --bind /dev/pts dev/pts
sudo chroot .
Firstly, setup locale, by uncommenting en_GB.UTF-8 in /etc/locale.gen and 'LANG=GB.UTF-8' in /etc/default/locale.
Source these two files and check with locale.
Initial Network setup
Raspbian by defaults has all the conflicting network package installed together! it has dhcpcd, systemd-networkd, NetworkManager, dhclient and what not. For rest of the guide, we purge all configs of network packages except the NetworkManager, this is essentially to make system clean without conflicting configs.
NetworkManager by default has dhcp functionality to get dynamic ip when connected to network interfaces but from my brief testing there is bug in this functionality. On the contrary dhcpcd and dhclient are fully fledged dhcp server which we don't require so it's pointless to have configuration set for these and make sure these services are disabled.
# systemctl disable dhcpcd
# systemctl disable dhclient
# systemctl disable systemd-networkd
# systemctl enable NetworkManager
Setting up static ip - preboot (DOESN'T WORK)
To setup up static ip on Debian based system, the creation of following file /etc/network/interfaces was recommended, but the following doesn't work in Raspbian rather breaks up the initial creation of ethernet eth0 device.
# cat /etc/network/interfaces
iface eth0 inet static
address 10.61.135.4
netmask 255.255.255.0
gateway 10.61.135.0
Configuring Static pre boot will be rectified in the upcoming iterations. Reference of other possible setups and EEPROM bootloader setup from RPI 4.
The configuration files for NetworkManager are located /etc/NetworkManager/system-connections/, but these cannot be created prior to initial boot because the MAC address of the SBC needs embedded into these \*connection files. The way as of now is copying the configs after the first boot and creation of wired and wireless connection using nmcli or nmtui.
Note: Before exiting chroot, make sure dhcpcd, systemd-networkd are disabled and sshd-config is setup properly.
Tcp Forwarding is enabled in /etc/sshd/sshd.conf.
#AllowTcpForwarding yes
Unmount the SD card root partition /.
umount -l /tmp/mnt/
Setting up static ip - afterboot
Since only NetworkManager service is enabled with chroot. It becomes straightforward to configure once SD card has boot on RPI. On the first boot, NM auto configures the ethernet device as 'Wired connection 1'.
This is reflected in the following directory,
root@rpi2:/etc/NetworkManager/system-connections# ls
'Wired connection 1.nmconnection'
The initial [connection] has the device specific uuid. When I tried to manually
generate with uuid(1), NM couldn't recognize the network connections, due to this
restriction leave the [connection] untouched. Replace the rest according to the
node number (X), eg.
[ethernet]

[ipv4]
address1=10.61.135.X/24
gateway=10.61.135.0
may-fail=false
method=manual

[ipv6]
addr-gen-mode=default
method=auto
To check whether the configuration is valid, nmtui can be used. These should
be reflected as shown in the screen capture below.
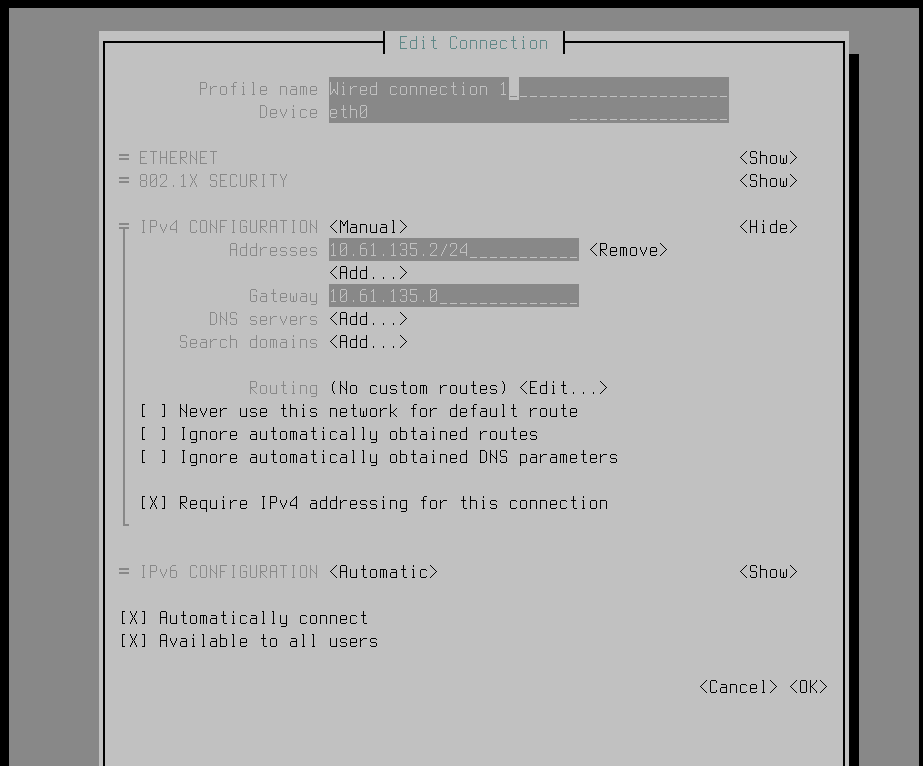
This connection can be activated instantly in the nmtui interface or a reboot
take care of setting the configured static ip.
Login node setup
Setting up eduroam wifi - afterboot
As mentioned in the project description, the cluster will exposed to cyberspace replicating real world HPC services. This requires atleast one of the login nodes to have working network connections. To make the setup portable, cluster is hosted on the university wireless network. Make sure the wifi is enabled on the rpi,
$ nmcli connection
$ nmcli radio
$ # remove kill all switch using any of the below
$ rfkill unblock all
$ ifconfig wlan0 up
$ nmcli radio wifi on
University network is based on eduroam. According to the claim, once the network is configured, it should be usable across all the institutions that has eduroam.
Setting up the connection initially was one of the painful things, since the offical installer required GUI to work!
I'm already connected to eduroam through a *nix machine and existing system-connections file helped to dissect the right network options. Before modifying on rpi nodes, an initial wifi configurations has to be created, additional info to configure from scratch
root@rpi2:/$ nmcli connection add type wifi con-name "eduroam" \
                                   ifname wlan0 ssid "eduroam"
root@rpi2:/etc/NetworkManager/system-connections$ ls
eduroam.nmconnection  'Wired connection 1.nmconnection'
This has generated eduroam.nmconnection files. Leaving out the [connection] block replace the rest with the working nmconnection file. A sample is given below,
root@rpi2:/etc/NetworkManager/system-connections# cat eduroam.nmconnection
# --- auto generated from  nmcli/nmtui
[connection]
id=eduroam
uuid=---specific-to-device----
type=wifi
interface-name=wlan0
timestamp=1764865738
# --- blocks that needs to be replaced
[wifi]
mode=infrastructure
ssid=eduroam

[wifi-security]
key-mgmt=wpa-eap

[802-1x]
eap=peap;
identity=c500@add.ac.com
password=xxxxxxxxx
phase2-auth=mschapv2

[ipv4]
method=auto
route-metric=1

[ipv6]
addr-gen-mode=default
method=auto
These configurations can be verified by checking the connection fields in nmtui.
Now the connection can be started with,
$ nmcli connnection           # list of name
$ nmcli connection up eduroam # up <name>
It's likely ping-ing the cyberworld doesn't work right away at this point. There are two things that needs to be taken care,
Dynamic ip for wlan0 with NM
Although NetworkManager has inbuilt dhcp server, in my case it always struggled
to assign a dynamic ip for the wlan0 device. Since dhcpcd is baked into this raspbian image, NM can be instructed to use it as a helper. An important note here is, dhcpcd shouldn't be started as a standalone service rather invoked externally by including the
config file /etc/NetworkManager/conf.d/dhcp-client.confi.
[main]
dhcp=dhcpcd
Restart the connection,
nmcli connection down <name>
nmcli connection up <name>
Wifi priority - mtu values
After a reboot, check the routing table.
Make sure wifi device's mtu value is the least for wifi device so it can ping cyberspace
overriding the ethernet, this is set in /etc/NetworkManager/system-connections/\* file by editing route-metric.
root@raspberrypi:/etc/NetworkManager/conf.d# ip route
default via 10.xx.x28.x dev wlan0 proto dhcp src 1x.61.xx3.2xx metric 1
default via 10.61.135.0 dev eth0 proto static metric 100
10.6x.1xx.0/18 dev wlan0 proto kernel scope link src 10.x1.xx3.xx1 metric 1
10.61.135.0/24 dev eth0 proto kernel scope link src 10.61.135.2 metric 100
With the setup so far, login nodes should access the web and compute node should be internally reachable.
Mirroring network configs
From my brief testing I found when powersaving mode is enabled in rpi, sshd server goes down in random intervals. It's best to configure two nodes with access to the cyberspace, rather than one.
# copy wifi config from the login node
$ scp /etc/NetworkManager/system-connections/\*eduroam*  rpiX:/tmp/
Ssh into other rpi node,
$ nmcli radio wifi on
$ nmcli connection add type wifi ifname wlan0 ssid <ssid>
Now copy the config from initial login node starting from [wifi] block and retain [connection] block from the current node in /etc/NetworkManager/system-connections/.
Set the config file permissions and restart the connection.
$ # cp the nmconnection eduroam file and set opt permission
$ sudo chmod 600 eduroam_final.nmconnection
$ nmcli con up eduroam
Internal connections
Check the internal status of interconnected nodes,
rpi2@raspberrypi:~ $ alias listrpi
alias listrpi='nmap -sn 10.61.135.0/24'
rpi2@raspberrypi:~ $ listrpi
Starting Nmap 7.95 ( https://nmap.org ) at 2026-02-12 03:27 GMT
Nmap scan report for mist-10-61-1 (10.61.135.2)
Host is up (0.0015s latency).
Nmap scan report for mist-10-61-135-3 (10.61.135.3)
Host is up (0.0012s latency).
Nmap scan report for mist-10-61-135-4 (10.61.135.4)
Host is up (0.0011s latency).
Nmap scan report for mist-10-61-135-5 (10.61.135.5)
Host is up (0.00097s latency).
Nmap scan report for mist-10-61-135-6 (10.61.135.6)
Host is up (0.00087s latency).
Nmap scan report for mist-10-61-135-7 (10.61.135.7)
Host is up (0.00099s latency).
Nmap done: 256 IP addresses (6 hosts up) scanned in 2.86 seconds
or
# Finding new rpi on the local network
$ sudo apt install arp-scan
$ sudo arp-scan –interface=eth0 10.61.135.0/16
Copy ssh-keys across the identified nodes for easier access,
for i in $(seq 3 7); do ssh-copy-id rpi$i@10.61.135.$i; done
Login node setup
As for HPCv1.0 is concerned, the ports of the login nodes are exposed to cybperspace only via the internal wireguard network of OpenBSD server. Only the device which are connected through this network can see and ssh the HPC.
Server side wireguard.
Use the shell script for making client's private & public keys
#!/bin/sh
doas wg genkey | doas tee client${1}-private.key | doas wg pubkey > client${1}-public.key
To create client config, save server's public key and client's private. This file will be sent/given to the client machine.
$ cat client14.conf
# specific to this client's conf
[Interface]
Address = 10.0.0.14/32
PrivateKey = <generated from shell script>
Dns = 10.0.0.1

# server's public info, common across all clientX.conf
[Peer]
PublicKey = KTaX28LTySHtqZrKlA/XzXFVqlkR5/hu28jm0=
Endpoint = x.171.x.105:x
AllowedIPs = 0.0.0.0/0, ::/0
Reload the config for wireguard server wg setconf wg0 /etc/wireguard/server.conf
Wireguard on Login node
To setup the wireguard,
apt install wireguard-tools
scp server:/tmp/clientx.conf /etc/wireguard/wg0
To resolve dns properly, the easiest way that works with wireguard is setting systemd-resolved (frowns)
apt install systemd-resolved
systemctl enable systemd-resolved && systemctl start systemd-resolved
wg-quick up wg0
systemctl enable wg-quick@wg0.server  # persist after boot
The network can be checked,
root@raspberrypi:/etc/wireguard# wg
interface: wg0
  public key: AuKQhVHEFTnHadajdUk7Q39ncR5qOSH9RQhU=
  private key: (hidden)
  listening port: 47084
  fwmark: 0xca6c

peer: dfruixdsfaldsk/XzXFVqlkR5/hu28jm0=
  endpoint: x.171.x.x:x
  allowed ips: 0.0.0.0/0, ::/0
  latest handshake: 24 seconds ago
  transfer: 380 B received, 3.34 KiB sent
Sharing Networking of head node
Check out this link for wifi connection via ethernet port.
On the login node,
sudo nmcli c add con-name custom-shared-con type ethernet ifname eth0 ipv4.method shared ipv6.method ignore
sudo nmcli c up custom-shared-con
On the node side,
$ sudo nmcli con mod "Wired connection 1" ipv4.address "10.61.135.X/24"
$ sudo nmcli con mod "Wired connection 1" ipv4.dns "10.61.135.2"
$ sudo nmcli con mod "Wired connection 1" ipv4.gateway "10.61.135.2"
$ sudo nmcli con mod "Wired connection 1" ipv4.method "manual"
$ sudo nmcli con  up "Wired connection 1"  # restart
$ cat /etc/resolve.conf                    # initial check
Inspirations
- https://garrettmills.dev/blog/2018/11/15/Building-a-Raspberry-Pi-Cluster-Part-I/
- https://medium.com/@hghcomphys/building-slurm-hpc-cluster-with-raspberry-pis-step-by-step-guide-ae84a58692d5
- https://carpentriesoffline.org/projects/miniHPC.html
Time sync across nodes
Install ntpdate to command the synchronization of system's date and time with a network.
sudo apt install ntpdate -y
Installation of slurm packages
$apt search slurm
slurm-wlm/stable 24.11.5-4 arm64
  Slurm Workload Manager
$ sudo apt install slurmj
Setup munge
Before proceeding to slurm setup, configure munge.
Munge is a dependency for slurm, a helper to interact with nodes.
Interacts with keys generated by time, so times needs to be synced
between rpis!
Checking network time service,
$ sudo timedatectl
If NTP (Network Time Protocol) service is not active, run,
$ sudo timedatectl set-ntp True
Munge on login & compute nodes
This follows from this git guide.
Setting up file permission for munge group, make sure /etc/munge/munge.key is present.
sudo apt install munge libmunge2 libmunge-dev
sudo chown -R munge: /etc/munge/ /var/log/munge/ /var/lib/munge/ /run/munge/
sudo chmod 0700 /etc/munge/ /var/log/munge/ /var/lib/munge/
sudo chmod 0755 /run/munge/
sudo chmod 0700 /etc/munge/munge.key
sudo chown -R munge: /etc/munge/munge.key
sudo systemctl enable munge && sudo systemctl restart munge
Before going to the client side,
cp /etc/munge/munge.key /tmp/
chmod +r /tmp/munge.key
scp this key over all the nodes, and place it on the /etc/munge then,
re-run the same permission commands.
munge -n | ssh rpiX  unmunge
STATUS:          Success (0)
ENCODE_HOST:     raspberrypi (127.0.1.1)
Slurm setup
sudo apt install slurmd slurm-client -y
Copy sample config file at /usr/share/doc/slurm-client/examples/slurm.conf.simple to /etc/slurm. Also refer,
man 5 slurm.conf
Few things to edit in the base config, reference here
SlurmctldHost, as rpi host and address. For this iteration keeping all the default options as it is and just defining the appropriate nodes and finally the 'shortjobs' partition to run jobs.
NodeName=rpi3 NodeAddr=ip CPUs=4 State=UNKNOWN
NodeName=rpi3 NodeAddr=ip CPUs=4 State=UNKNOWN
PartitionName=shortjob Nodes=ALL Default=YES MaxTime=INFINITE State=UP
CPU resource allocations
Copy the example config from /usr/share/doc/slurm-client/examples/cgroup.conf
Add just one parameter for
AllowedDevicesFile="/etc/slurm/cgroup_allowed_devices_file.conf"
Starting slurmd and slurmctld (controller) daemons!
Debugging slurm service
First make sure to change the host names using,
hostnamectl set-hostname new-hostname
After enabling and starting the slurmd service, this will make login node act as one of the compute node.
Read systemctl status slurmd, few inbuilt options
needs to be commented out, in cgroups.conf & slurm.conf
#CgroupAutomount=yes
Also include the login node's address in the slurm config file.
rpi2@rpi2:~ $ systemctl status slurmd
● slurmd.service - Slurm node daemon
     Loaded: loaded (/usr/lib/systemd/system/slurmd.service; enabled; preset: enabled)
     Active: active (running) since Fri 2026-02-13 05:26:32 GMT; 31s ago
 Invocation: 944640baed6a47afaf8afe1413a4cb3d
       Docs: man:slurmd(8)
   Main PID: 4230 (slurmd)
If the node deamon has succesfully, time to start the controller daemon with
sudo systemctl enable slurmctld && sudo systemctl start slurmctld
These slurmd configs need to be copied again to all the nodes. And slurmd service should be enabled.
$ sinfo # lists the available paritions for job submission
PARTITION AVAIL  TIMELIMIT  NODES  STATE NODELIST
shortjob*    up   infinite      3   idle rpi[2,4,7]
Temporary Shared partition solution
Since there is no shared directory at the moment, stderr are puked.
slurmstepd-rpi2: error: couldn't chdir to `/home/rpi7/shared': No such file or directory: going to /tmp instead
To temporarly overcome this we cause use sshfs to fusemount a partition
from one of the node to all the other.
On the head node,
mkdir /tmp/shared
cd /tmp/shared && touch this_is_main.txt
On the compute nodes,
apt install sshfs
mkdir /tmp/shared && cd /tmp/
sshfs rpi2@rpi2:/tmp/shared  /tmp/shared
cd shared && ls
Do the above for all the nodes and now check the logs, /var/log/slurm/slurmd.log
[2026-02-13T09:00:17.043] [16.batch] error: Controller memory is not enabled!
[2026-02-13T09:00:17.182] [16.batch] done with step
[2026-02-13T09:03:16.007] Launching batch job 19 for UID 1000
[2026-02-13T09:03:16.035] [19.batch] error: Controller memory is not enabled!
Setting up UID
From the log it's evident, that slurm executes as user with UID 1000, make sure this is true for all the nodes.
rpi7@rpi7:~ $ id rpi7
uid=1000(rpi7) gid=1000(rpi7) groups=1000(rpi7)

rpi4@rpi4:~ $ id rpi4
uid=1001(rpi4) gid=1001(rpi4) groups=1001(rpi4)

rpi4@rpi6:~ $ id rpi6
uid=1000(rpi6) gid=1000(rpi6) groups=1000(rpi6)
Make sure the users and uid are synced across multiple node, here only 6, 7 is going to work on a shared directory!
Link for user_group identification.
Best gid/uid practice
$ sudo sysctl net.ipv4.ip_forward=1
$ sudo iptables -t nat -A POSTROUTING -o wlan0 -j MASQUERADE
$ sudo iptables -A FORWARD -i eth0 -o wlan0 -j ACCEPT
$ sudo iptables -A FORWARD -i wlan0 -o eth0 -m state --state RELATED,ESTABLISHED -j ACCEPT